
Using git-crypt to encrypt files in a public Git repo..
We created a demo explaining how to integrate git-crypt into a minimalist Swift/SwiftUI app under Apple’s Xcode. GitCryptDemo is available on GitHub.
The aim is to have a Git software repository that contains a file that needs encrypting. We want the project to be buildable/runnable without any modification — regardless of whether you have access to the encryption key. This graceful degradation is a feature of git-crypt. But the graceful degradation also requires the app to adapt in case the key is not available. So when you don’t have compile-time access to the key, some of the app’s functionality automatically gets disabled or otherwise degraded.

Requirements and assumptions
The target requirements we are aiming for are listed here. We will come back to how they are achieved in a moment. The requirements/assumptions:
- The app needs to contain a
Secret(e.g., an API key) that should stay secret. Anyone with the source code can create and insert their ownSecret, but they cannot access theSecretof the original contributor. - The app’s code is archived in a repository that includes an encrypted copy of this
Secret. - This implies that there is another secret needed to enable decryption. To avoid confusion, we will call that second secret the
Key. - The
Keyis not shared in the repository (otherwise we would be heading for an endless loop). ThisKeymight be reused across a few other projects, or might be shared via a private communication with collaborators on the app project. - For anyone with access to the
Key, the app builds and runs as-is, with full functionality. - For anyone without access to the
Key, the app builds and runs as-is, but with reduced functionality. What “reduced” looks like will vary per app.
Possible uses
- A server’s API provides sample weather information. But some kind of registration key gives you better information or more up to date information.
- A server’s free API provides map data, but at a limited number of requests/day. Higher request frequencies requires a license of some sort.
- A server hosts certain documents that are only accessible if you have some secret code.
- A WordPress website hosts a few password-protected pages. The password protection can be fetched without user help by passing a private code as a parameter in the URL.
Notes
- Protecting the
Secretis essential if your repository is public. But it also can act as a safety net when the repository is private. - The demo happens to use Swift/SwiftUI/XCode. The principle can be applied to other languages.
- The demo happens to mention GitHub. The principle should work with similar services like GitLabs and BitBucket.
- If a user with access to the
Keygenerates a binary version of the app for distribution,Secretis available unencrypted somewhere inside the app. So, if you distribute that version of the app,Secretcan be extracted by anyone with enough skills and determination. So this approach assumes either controlled distribution of the fully functional version, or that the risks are simply acceptable. This limitation is unavoidable because the fully functional app itself by definition needs access to an unencrypted form of theSecret. For instance to convince an API to provide certain functionality. So even if you obfuscateSecretwithin the app, there is at least a brief moment in time whereSecretcan be seen in a debugger of by snooping network traffic. - There are undoubtedly alternative approaches that can meet the listed requirements. For example
- GitHub has a feature to store Secrets that are accessible only to contributors via Actions. In that approach
Secretis not an integral part of the actual source code and is not subject to version-control. - Using
.gitignoreto simply keepSecretout of the repository does not meet all the requirements. In particular, you will get a compile-time error if an expected file in the bundle is missing.
- GitHub has a feature to store Secrets that are accessible only to contributors via Actions. In that approach
How each requirement is addressed
- the app needs to contain a
Secret
This demo app contains a pair of text files named Unsecret.txt and Secret.txt. Unsecret contains “Hello, World!” and is never encrypted. Secret.txt would contain something worth protecting (here it merely contains the string “Hello, secret World!”). The app displays “Hello, secret World!” if it can, but otherwise degrades to displaying “Hello, World!”. 😞
- the app’s code is in a repository that includes an encrypted copy of
Secret.
The encryption is handled by git-crypt, which is configured via an entry in .gitattributes that says Secret.txt filter=git-crypt diff=git-crypt. This causes Secret.txt to get encrypted before it reaches the remote repo. And it gets automatically decrypted when it is pulled from a remote repo.
- This implies that there is a second secret. Let’s call that the
Key.
git-crypt, after initialisation in your project directory, can be asked to export the key via $ git-crypt export-key <path>.
If you choose $ git-crypt export-key ../git-crypt-key, Key can be shared across multiple projects, or multiple variants/branches of the project. And should still have the key if you delete your local directory and reinstall by cloning from the remote repository.
- The
Keyis not shared via the repository.
If your Key is stored in or below your project directory, you need to prevent uploading to the repository by listing it in the Git .gitignore file. If Key is stored in a parent directory, you might want to list it anyway, just in case.
- with access to the
Key, the app builds and runs with full functionality
This is a matter of detecting that the file Secret.txt is not encrypted in your local file system, and using this to do whatever your software needs Secret for. The detection can rely on the fact that a file encrypted by git-crypt starts with a fixed 10 byte sequence (GITCRYPT with a leading and trailing zero byte). The swift demo app simply detects this by catching if the function call String(contentsOfFile: filepath) throws an error.
- without access to
Key, the app builds and runs with reduced functionality
The app needs to implement this custom logic. In this case it involves using Unsecret.txt instead of Secret.txt. Again, the fact that Secret is encrypted is done here by catching an exception thrown while converting the text to a Swift String.
Running the demo
To get a local copy up and running, use GitHub’s Open with Xcode feature, compile and run on a simulator or physical device (iPhone, iPad or Mac). Your local copy of the code will, by default, contain an encrypted version of Secret.txt (cat Secret.txt or view the file in XCode). When Secret.txt is encrypted, the app automatically switches tot using Unsecret.txt instead.
Tips for integrating this into your app
Setting up something similar from scratch is a bit cumbersome. Arguably because usage of both .gitignore and git-crypt are relatively error-prone. The complication lies in the fact that it is very easy to make a mistake, resulting in the uploading of an unencrypted version of whatever the Secret is. And Git makes it extremely difficult to remove all older versions of a specific file: Git just don’t want you to deal with files, it deals with commits instead. So Git works hard to make things miserable for anyone who even thinks about (from Git’s perspective) corrupting Git’s archive of past commits. Another complication is that .gitignore needs to be set before you create the sensitive file. You can’t set .gitignore and then replace a dummy version of Secret.txt by the real thing: if you do that, Git ignores that .gitignore rule and happily keeps pushing your key to the remote repo.
So, as general advice:
- Use a dummy secret until everything is set up. Then prove to yourself whether that
Secretis indeed encrypted if you clone the repository without using the key. Then check that you can decrypt the dummy secret using your key. Thenlockthe repo again (you will regret it if you don’t). Only insert your realSecretonce you have proven that all this works. If you add your secret earlier while setting all this up, it is almost certain thatSecretwill end up unencrypted in your repository within some older commit, where it can be read by bots designed specifically to look for this kind of thing. - Use the Git command line a lot. Its use can coexist with using the GUI for source management in Xcode:
- Use
git status(on the command line). Use it a lot to detect general Git issues. - Use
git-crypt status(on the command line) even more when making changes to encryption setting or encrypted content. It can actually warn you about leaking unencrypted versions of the file you intended to only push in encrypted form.
- Use
Stepwise instructions
Normally having access to working source code should be enough to get you going. Unfortunately, this setup process involves some initialisation via the command line and some files that are typically done outside the source code.
So setting up your own project (in XCode) that uses git-crypt can be done as follows. Remember that the order of the steps is critical in some places (otherwise you end up with an unencrypted copy of Secret.txt in the repository or end up publishing your encryption key!):
- Create an new project in Xcode.
Xcode has integrated Git support since 2011, so there is no need to install Git. You could have XCode enable source management for this project by checking the optionSource control: ☑︎ Create Git repository on my Mac. But let’s do that manually in a moment, so let’s uncheck the checkbox.
In about 10 steps, you will need to have an account at GitHub (or a similar service). This requires the setup of your authentication with GitHub, and linking Xcode that that GitHub account. This can be found in Apple’s source control documentation. - At this point, your source files are not version managed yet.
You can confirm this by running the command linegit statusfrom a MacOS Terminal or command line window.
This reportsnot a git repositorybecause there is no.gitsubdirectory in your project’s root directory. - Enable Git source control
Rungit initfrom the Terminal while you are in the root directory of your repository. The repo’s root directory is the one that contains (at this point) two subdirectories respectively namedGitCryptDemoandGitCryptDemo.xcodeproj.
The project root directory is also calledGitCryptDemo, and will serve to contain everything as the project project grows.
Run ‘git status` again to confirm that it worked.
Actually we need to do a bit more to reach the same point as the checkbox in XCode that we skipped: rungit add .(the period is intentional) to put the current contents of the project directory and its subdirectories under source control.
Rungit statusagain to see what files are now being monitored. These files are being watched, but haven’t been stored in the local git repository get (they haven’t been “committed”). We will commit these files and more later. - Install the Homebrew package manager
You can check if Homebrew is already installed by typingwhich brewin the Terminal. You can find Homebrew via GitHub or via https://brew.sh. Homebrew provides an easy way to installgit-crypt. - Install git-crypt
This involves typingbrew install git-cryptin the Terminal window. At the time of this writing, the latest Homebrew version was 0.7.0.
Rungit-crypt statusto see that the installation was successful. It will tell you that none of files being monitored by Git are encrypted so far. - Create a basic .gitignore fileSafety first…
Before generating keys, let’s make sure encryption keys never end up in Git or on GitHub. We need to add 2 lines to a.gitignoretext file in your project root directory. If the file already exists, use an editor or the editor in Xcode. If you need to create the file you could use the following sequence of commandscat >.gitignore, followed by.git/git-crypt/keys/**, and../git-crypt-keyand finally Control-C. This copies two lines of text into the file.gitignore.
The first line covers the default location ofgit-cryptkey files. For examplemyproject/.git/git-crypt/keys/default.
The second line covers a name and path where the key might be placed to get it above themyprojectdirectory, where it can be used by multiple projects. Usecat .gitignoreto check the result.
If you rungit statusagain now, you will find that the new.gitignorefile is not being tracked. Git itself wants you to add this file, but we will do that later.
Incidentally, if you create files via Xcode’sNew file...menu command, they become part of the Xcode project. Which will, in turn, allow Xcode to automatically performgit addfor these project files when you commit all changes in the project to Git. The setting for this isSource control: ☑︎ Add and remove files automatically - Creating a workable .gitignore file
Actually it is good practice to extend.gitignoreby a set of standard files used internally by MacOS, XCode and Swift.
You can generate those lines using the gitignore.io or Toptal online .gitignore generator service. Most of those lines are for older versions of Xcode, but it avoids cases where Git is trying to track Xcode files that save the state of the Xcode user interface. Which in turn prevents Git from thinking something needs saving, while you were sure that you didn’t modify anything: you didn’t change the code, but Xcode did change a file. - Enable
git-crypt
Rungit-crypt initto generate a new key, andgit-crypt export-key ../git-crypt-keyto save it in the parent directory.You can use any file name instead ofgit-crypt-key. We gave it a generic name here because it might be used in other projects as well.Usecat ../git-crypt-keyto view the file. It is not really a valid text file, but does contain a text stringGITCRYPTKEY. - Configure what to encrypt
An extra file called.gitattributesin your project directory will tell git-crypt what to encrypt. Again, you might want to use an editor, especially if the file already exists. Alternatively we can create it from a Terminal window usingcat >.gitattributes, followed bySecret.txt filter=git-crypt diff=git-cryptand Control-C. This tells Git to use git-crypt to encrypt and decrypt files, and to detect changes in encrypted files (diff). - Fix the path to Homebrew on MacOS
For newer MacOS with Apple Silicon (M1 and M2 series, etc) useecho $PATHto check that your path contains /opt/homebrew/bin. This is relevant because homebrew changed this path with the introduction of the new M-series.
Because I still had problems here, I suggest that you edit the (existing)./sub.git/configfile to contain absolute path names (I suspect thatfilteranddiffsomehow bypass the path):
   [filter "git-crypt"]
      smudge = \"/opt/homebrew/bin/git-crypt\" smudge
      clean = \"/opt/homebrew/bin/git-crypt\" clean
      required = true
   [diff "git-crypt"]
      textconv = \"/opt/homebrew/bin/git-crypt\" diff
There must be a better way that solves this for all git-crypt projects on MacOS, but this will fix the problem for one individual project.
- Create Secret.txt and Unsecret.txt
In your repository’s root directory, createUnsecret.txtusingcat >Unsecret.txt, followed byHello, World!and closed by Control-C. This text will not be encrypted.ForSecret.txt, it is best to fill it withTemp secretinstead of an actual secret. This is because of the pretty real risk that the file ends up in the repository in unencrypted form, where it can be very hard to remove.
Just “overwriting” an unencrypted by an encrypted file with the same file name won’t really work because the older version stays visible in the repository – for anyone with a script that scans for such misplaced secrets. Such scripts and people do exist. - Is Git tracking all the required files?
Withgit statusyou can see all files that still need to be committed. That includesSecret.txt,Unsecret.txt,.gitignoreand.gitattributes. This is because they were made after “git add .“. You can add all 4 files now with a newgit add .command. Remember thatSecret.txtwill be checked into the repository – but hopefully only in encrypted form. - But will we encrypt the right files?
Now rungit-crypt statusto check git-crypt’s plans for all our files. It should showencrypted: Secret.txtandnot encrypted: Unsecret.txt. But…
Withcat Secret.txtyou will discover that the file is still unencrypted in your local directory. So “encrypted” here should be interpreted as a promise what will happen when the file gets copied (“committed”) into a (local or remote) Git repository. - How about finally encrypting something?
We first need to commit these 16 or so files to the local git repository (in.git). So usegit commit -m "Initial commit"with -m for the message or documentation of what this commit is.git statuswill now show that all those files are “staged” in your local repo copy.
Back in XCode, you can useFile|Add files to "GitCryptDemo.xcodeproj"...to add the four new files (Secret.txt,Unsecret.txt,.gitignoreand.gitattributes) so they show up in the Xcode project as well. XCode shows that all source files have been committed. Only GitCryptDemo itself may show an M (for Modified) in the Project Navigator. If you really want to know what that is,git statusmay show a file likeGitCryptDemo.xcodeproj/project.pbxprojwhich is again internal book keeping used by Xcode. We could ignore it (here is an alternative).
At this point you might actually want to build and run the default app. On a Mac it will show a very small, easy to overlook window. But you can also run the code on an iOS device where it is shown full screen.
It displays “Hello, world!” with a lower-case “w”. That text is neither of the 2 text files, because we are not using them yet.
At this point, we have actually encrypted something (going bygit-crypt statusand the fact that we have done a commit. But it is not really convincing yet. - Pushing the commit to GitHub
In Xcode’s Source Code Navigator, go to the Repositories tab. There, right-click the topmost item in the tree.
This gives a menu where you should execute the optionNew "GitCryptDemo" Remote.... This means you will be “pushing” the content of your local Git repository to a (just created) remote repository stored under your GitHub account.
If you now navigate (e.g. in a browser) to your account in GitHub, you can inspect the committed contents ofUnsecret.txtandSecret.txt. And NOW GitHub will show an encrypted version of Secret.txt and an unencrypted version ofSecret.txtand all other files. - Completing the app
You can now update the Swift files in the new app to match those in the GitHub vdHamer/GitCryptDemo repository. That extends the app to use the content of eitherSecret.txtorUnsecret.txt(when the app sees thatSecret.txtis encrypted).So within the app you should see “Temp secret” displayed, because that is how we left the concent ofSecret.txtin Step (11). Now you can edit it to say “Hello, secret World!”, and commit the change and push it to GitHub. You can do this entirely from theSource Controlmenu in Xcode: the encryption is handled automatically. Essentially Xcode controls git which in turn controlsgit-crypt. - Some final testing
To test what all this looks like if you don’t provide the encryption Key, you might want to create a new local repository from scratch namedGitCryptDemoClone, but with the content of thevdHamer/GitCryptDemoGitHub repository.
A fast way to do this is to go to that repository, and click onCodeandOpen with Xcode.
Then confirm that the fileSecret.txtis encrypted there by viewing it. You should also see that an app built from this repository now displays “Hello, World!” with a capital W (as in the fileUnsecret.txt). Which confirms that the app decided that file was encrypted.
Bonus: should it really be this complicated?
It took 17 steps to set up everything more or less from scratch. With multiple tricky points – unless you knew most of this already. Admittedly, those steps included setting up a GitHub account, linking it to Xcode, installing Brew, and installing git-crypt using Brew. Which you don’t need to do for every project. And thus may have done already.
We obviously included various steps for checking and learning. These involved lots of command line commands in the Terminal window because Git tends to get messed up easily unless you really understand what every command will actually do.
For example, to give people a mental model of the Git world, there is (kind-of officially sanctioned) Visual Cheatsheet which represents a Git-based environment as 5 boxes between which you copy files and send/collect information:
- Stash (a closet to temporarily hide changes when the going gets rough; not used above)
- Workspace (the project’s directory, used above)
- Index (bookkeeping files in the .git directory, implicitly used by Git in the above)
- the Local Repository (a full source controled archive stored in the .git directory,
commitsbring data there) - the Remote Repository (GitHub,
pushesdump data there, but we used Xcode for any pushing to handle the required authentication/authorization)
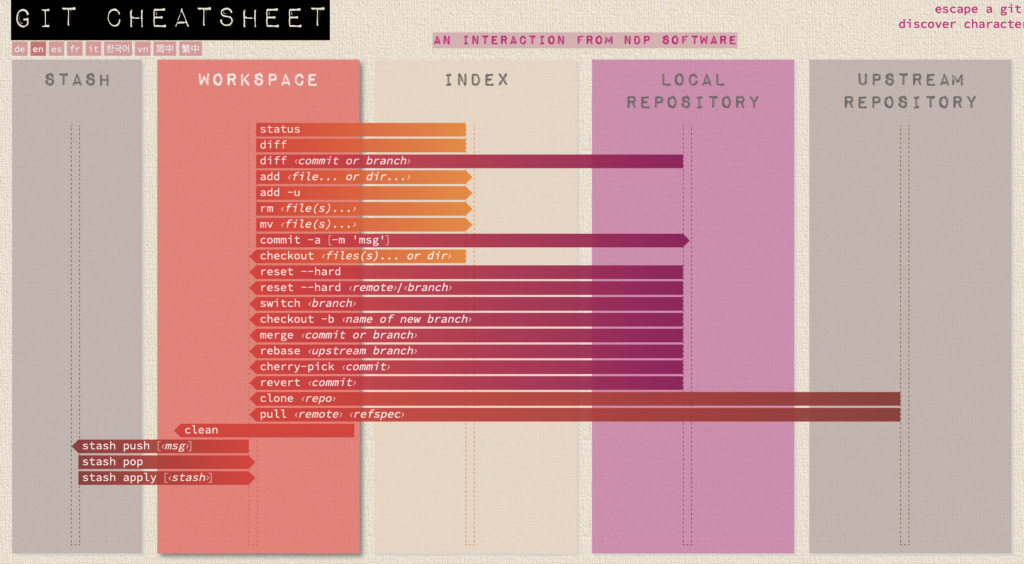
That 5-box diagram is already hard to understand, so it is animated to show all the main data flow in steps. And, real world Git usage has more dimensions: you can have multiple branches of changes before these are merged. And you can have as many ‘remote’ repositories as you want, sometimes containing forked rather than cloned copies of the code.
Arguably Xcode and git-cryp add one or more levels to the 5-box model: The Xcode Project concept is a lot like the (invisible) Git Index concept. Both are a registration or directory system used to find and track code and its status. You may thus have files in your directory/localWorkspace that the Xcode Project doesn’t know or care about. And files in your Project that Xcode was tracking, but which somehow vanished without Xcode getting notified. In itself a classic example of an abstraction level that can be bypassed, leading to complexity.
And Xcode automates some of the interaction with Git, but the Xcode Source Control commands don’t cover everything
and often individual commands map to multiple (configurable in Preferences) Git commands. A developer once remarked (likely on StackOverflow, I couldn’t find the literal quote):
If you want to get help with Git on the Internet, and try to explain the problem in terms of some kind of IDE or graphical shell around Git, you are likely to get zero responses by the experts. Every IDE or graphical shell
works differently. You will simply have to explain your problem at the generic Git command-line level.
Probably all this points to leaky abstractions. Git is is considered a fast, trustworthy, scalable, standard, and maybe elegant solution for a way bigger problem than most people handle: world scale distributed collaboration. But it doesn’t scale elegantly downward to handle normal problems using single a readily explainable model.
By analogy, e-mail protocols also deal with a world-scale distributed system that synchronises data across servers and e-mail clients. There too, a single user can use multiple devices to send and view e-mails, sometimes across multiple accounts. But the e-mail protocols are designed based on a much more explainable high-level functional model (“it should arrive eventually”, “if your device is offline, you can read what your laptop knows about, and prepare a response that will be sent later”, “you see the same inbox across your devices, regardless of what you do”). In case of Git, it seems the command line user-level commands are the highest available high level model. So you have to express what you need to do in terms of these. Instead of being able to reason about what you are actually trying to do, you have to stoop to the level of these commands and try to figure out which set in which order will do what you hope to do.